The Complete WBPP Guide: Interface, Master Calibration Frames, and the Execution Pipeline
This article is compiled from notes taken between 2021 and 2024. Some tools and workflows have since been updated, so keep that in mind as you read; the interface, options, and version-specific behaviors mentioned here (such as versions 2.1.2 and 2.5) all reflect how things were at the time. As for the errors and known bugs you may run into during execution, see the separate article “WBPP Troubleshooting.”
WBPP (WeightedBatchPreprocessing) is the PixInsight script that runs “calibration, registration, and integration” from start to finish, fully automated—and it’s astonishingly convenient. It has been revised frequently over the past few years, and I’ve written a fair number of scattered notes about it along the way; this article pulls them together into a fairly complete rundown, organized into three layers: the core concepts that don’t change much between versions, the current execution pipeline, and some of the important changes across the various versions over the years. No matter which version you’re on, get the concepts straight first, and however the interface changes, you won’t panic.
Core Concept 1: The image WBPP stacks is only a preview
This is the point I most want to make first, and also the one most people overlook.
I fell into this trap myself: after one session with Drizzle Integration, I noticed that the centers of the stars (the oversaturated regions) had actually turned black. Tracing it back, the culprit turned out to be using WBPP to do the integration.
Convenient as WBPP is, the master light it auto-integrates comes with a very clear official stance—it’s only a convenient preview of “what’s achievable,” to be discarded once you’re done, and it should never be treated as a finished product. Here’s the relevant excerpt from the official reply on the forum:
The integrated image generated by WBPP is just a convenience preview of the achievable image, but it should always be deleted/ignored, and the integration should always be done manually with the registered frames. This is the only way to obtain an optimal integrated image with full control over the normalization, pixel rejection and noise reduction tasks.
The official reply even half-jokingly said it would repeat this “n+1 times, where n is already approaching infinity”: the master light WBPP produces should never be used as your final result—it’s just a preview, and the best result has to come from a manual Image Integration that optimizes pixel rejection and signal-to-noise ratio.
So my own habit is: WBPP only ever goes as far as the “star registration” step; the real integration is handed back to a manual Image Integration. The proper step-by-step approach—calibration (handled by WBPP), registration (Star Alignment), and integration (Image Integration)—does take a few extra steps, but once something goes wrong, it’s much easier to figure out which link in the chain broke. This became my settled conviction later on. Those two very detailed WBPP tutorial videos from Japanese enthusiasts in the early days are ones I also highly recommend, but they need the same caveat added: treat the integration result as a reference only.
Core Concept 2: Know which files in the Master folder are the finished products
After a full WBPP run, the default Master folder ends up with a pile of files, and a lot of people can’t tell which one is the one they actually want. Let me explain:
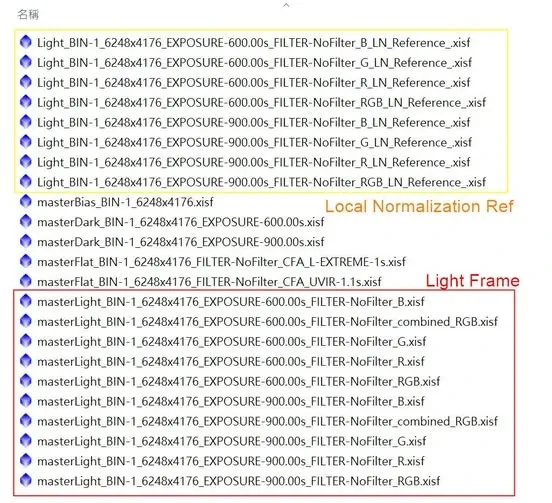
- The image in the red box is the integrated, finished master light you want.
- The image in the yellow box is the Local Normalization reference (Ref) image, not the master light—don’t mix them up.
- The images with no box are the master calibration frames, which here include the master flat, the master bias, and the master dark.
(That said, following on from the previous section, this “master light” is still just a WBPP preview—if you want to do it right, you should still re-integrate it yourself.)
The current pipeline: the full works for a color camera
WBPP goes one-click all the way through, but behind the scenes it’s actually a long series of automated processes running in order. Taking a color (OSC) camera as an example, the full execution order is as follows:
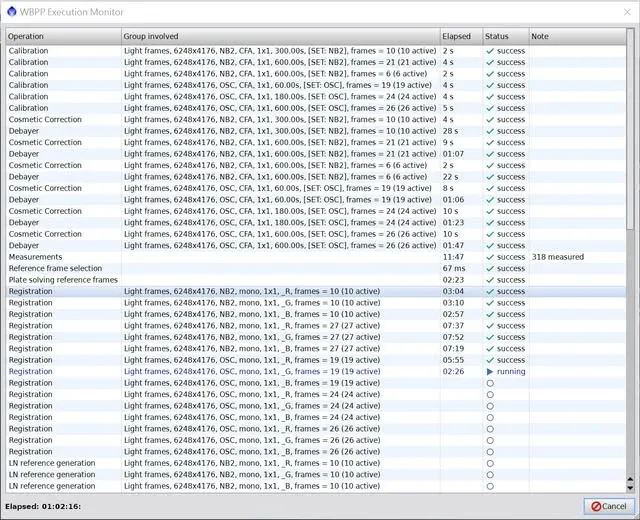
- Calibration File Integration: build the master calibration frames
- Calibration: calibrate the light frames
- Cosmetic Correction: remove hot pixels or bad lines
- Debayer: debayering (separate RGB)
- Measurements: measure the light frames and assign weights
- Reference frame selection: choose the reference image for registration
- Plate solving reference frames: plate solve the reference frames
- Registration: register the stars
- LN reference generation: generate the Local Normalization reference image
- Local Normalization: run Local Normalization
- Integration: integrate the light frames
- RGB Combination: recombine the three RGB channels
In more condensed terms, you could also boil it down to eight steps: build the calibration image files → image calibration → Cosmetic Correction → debayering (separating the three RGB channels) → star registration → Local Normalization → image integration → RGB channel combination.
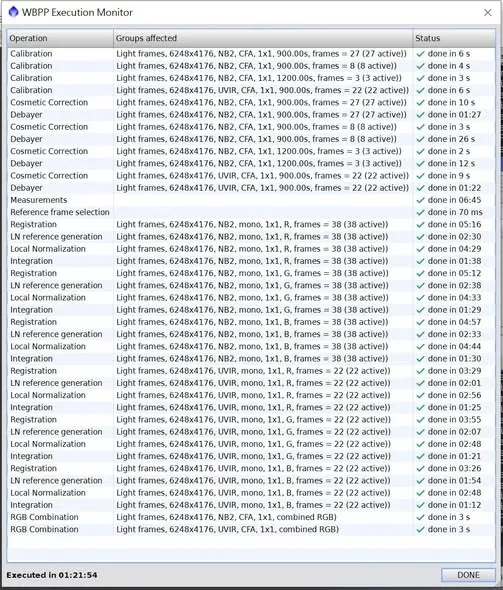
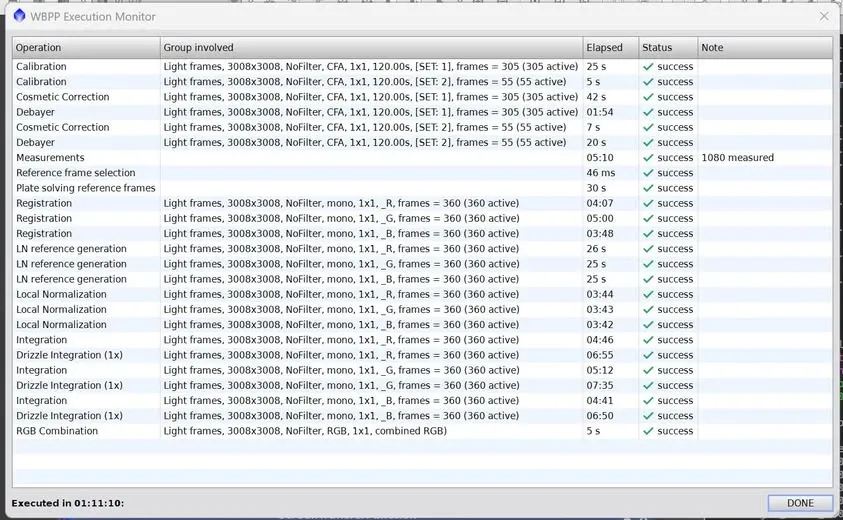
Two of these steps are worth a few more words: RGB separation exists to overcome chromatic dispersion (where the edges of stars look like they have different colors on each side), at the cost of extra runtime; and Drizzle Integration, if it’s used, isn’t here to enlarge the image but to avoid artifacts, so it’s only meaningful when you have enough dithered frames—generally, below 50 frames you can skip it. As an aside on how the timing actually feels: I once ran 360 nine-megapixel frames all the way from calibration to Drizzle Integration 1x, and it still took a good hour-plus; higher resolution only makes things more “exciting.”
Master calibration frames: where WBPP is clever
WBPP hides quite a few thoughtful touches in how it handles calibration frames (flats, darks, biases, and so on)—enough to deserve a section of its own.
Calibration frames are best rebuilt from the raw files inside WBPP. Plenty of people find their light frames have problems after calibration, and the main cause is often that they applied “Master files made by other software or processes” (master flat/bias/dark). The safest approach is to throw the raw calibration files into WBPP and let it rebuild the Masters.
Small discrepancies in exposure time? Let Exposure tolerance handle it. An enthusiast once asked in the group: he was using Eqmod signal control to shoot darks, and because of latency, his 5-second darks might actually land somewhere between 4.980 and 5.02 seconds, so he wanted to switch to shooting with NINA. As it turns out, WBPP already thought of this: calibration frames within a certain time difference can be assigned to the same group, and WBPP will automatically do the right processing for calibration frames in the same group and automatically pair them with the light frames. That tolerance value is Exposure tolerance.
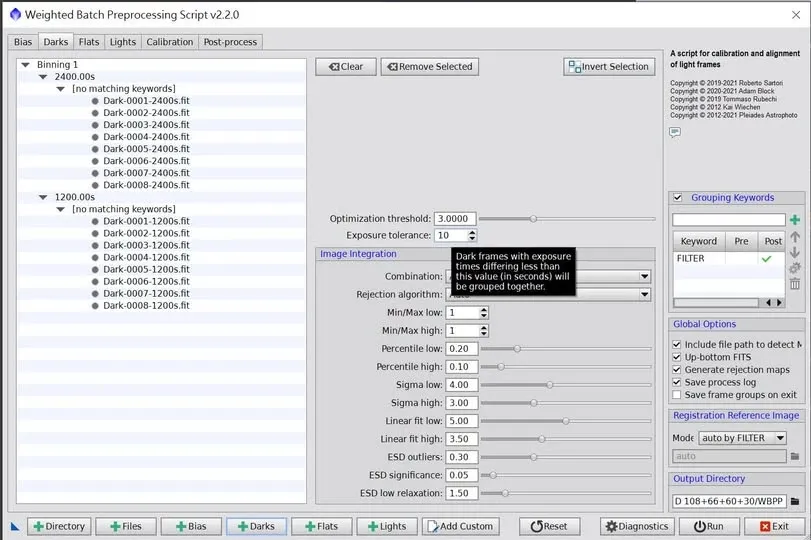
Images shot on different days? Handle them all at once with Grouping Keywords. After a revision, WBPP gained a grouping feature, so even images shot on different dates can all be thrown in and processed together—as long as you classify them in Grouping Keywords using a keyword (a date, for example). Take my batch of files: the flats differ from day to day, yet WBPP could still automatically calibrate them separately by date, without me having to set up the light-and-flat pairing by hand for each different date. Extremely convenient.
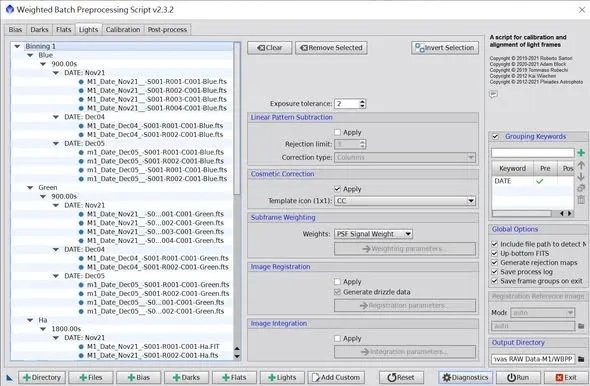
Just want to build master calibration frames? You don’t even need light frames. This is a use a lot of people don’t know about: with no light frames present, throw your darks, biases, flats, and flat darks into WBPP, and it will cleverly turn these calibration frames into master calibration frames following the correct steps, outputting them to the folder you specify—saving you the hassle of building them by hand with a variety of different processes.
Light page options and speed-up tricks
The WBPP Light page has a row of options that you can check as needed. By default, everything except subframe weighting is unchecked.
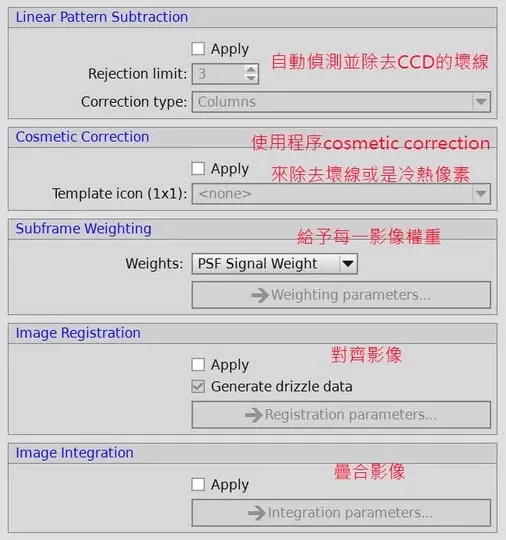
Since these steps can be turned on or off, that raises a practical question: how much time can you save by turning off the processing you don’t need? I ran a real test on a set of freely downloadable data from abroad—372 sixteen-megapixel frames in total—and after cutting out the processing I didn’t need, it ran roughly 7 to 8 times faster (25 min 03 sec vs. 03 min 30 sec), while image quality took only a slight hit—about 15% on my local machine, and virtually indistinguishable once compressed and sent over the web. For situations where you’re racing a deadline or just want a rough look first, this trade-off is well worth it.
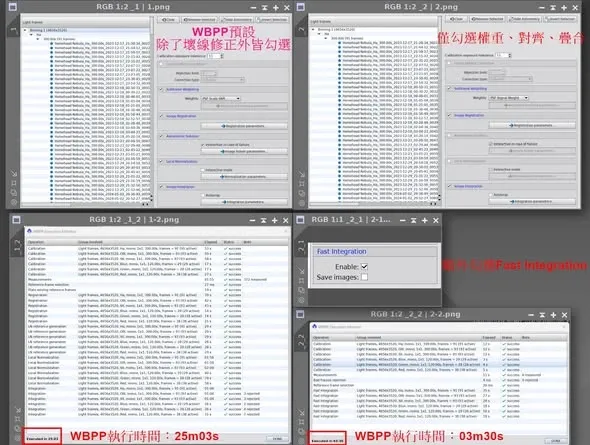
As for which steps eat up the most time and which ones are most effective to turn off, I’ll come back to that in the article “WBPP Troubleshooting.”
Version changes: these came later
WBPP has added quite a lot over the years. Let me lay out a few of the important milestones so you can cross-check against the version you’re holding:
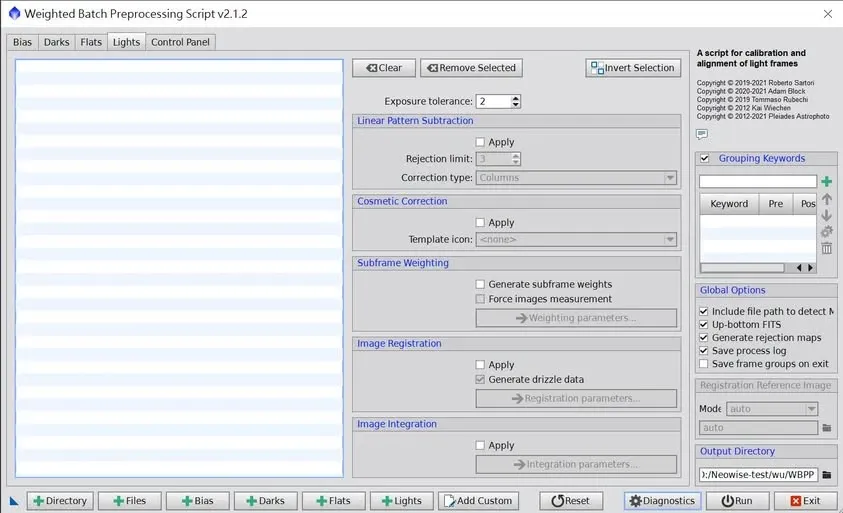
A few things from version 2.1.2. Starting with this version, three points are worth noting: first, light frames having problems after calibration is often because externally made Master files got mixed in (see above); second, Dark frame optimization is mainly used when the light and dark exposure lengths don’t match (for example, a 20-minute light paired with a 30-minute dark), works best with long exposures and multiple frames, and the option only shows up when you click on a light frame; third, CCD sensors gradually develop defects with use—especially column defects—in the past you had to build a defect map to remove them, which was very time-consuming, and WBPP introduced Linear Pattern Subtraction to help deal with this.
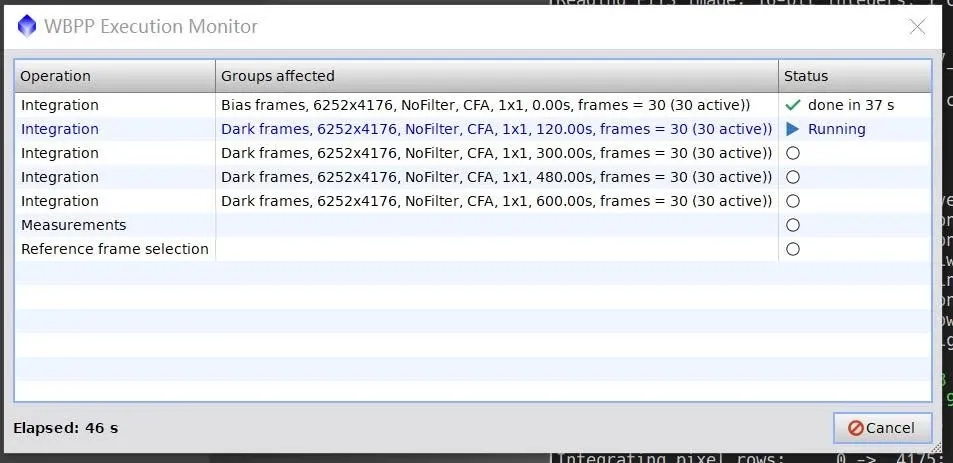
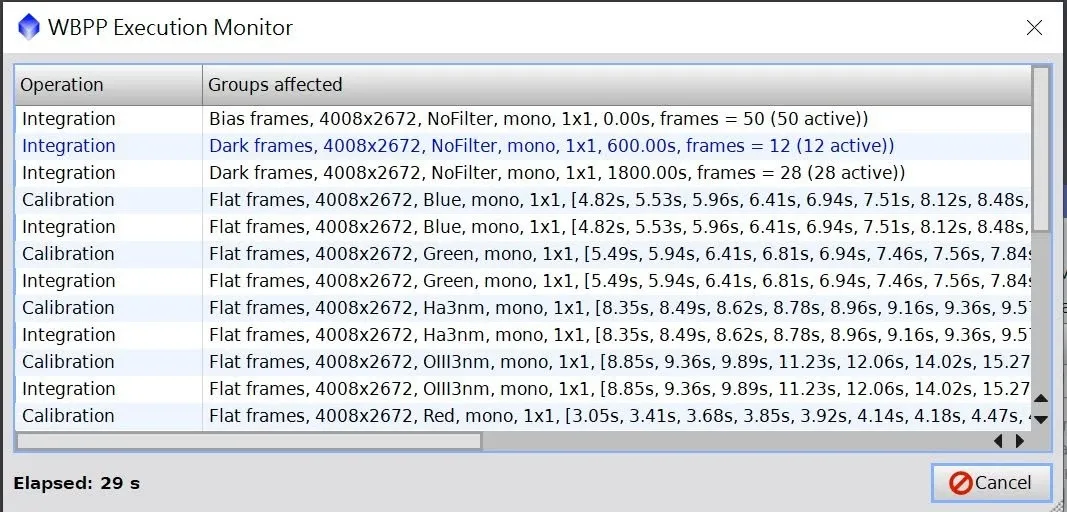
Execution Monitor. After updating to a newer version, WBPP will pop up a WBPP Execution Monitor window while it runs, telling you which step it’s currently on and what work it has done, with content you can even scroll and drag up and down. In older versions, apart from staring at the current console, you had no way to know the progress at all—you could only wait for everything to finish, or for it to stop on an error, before you could confirm anything via the console.
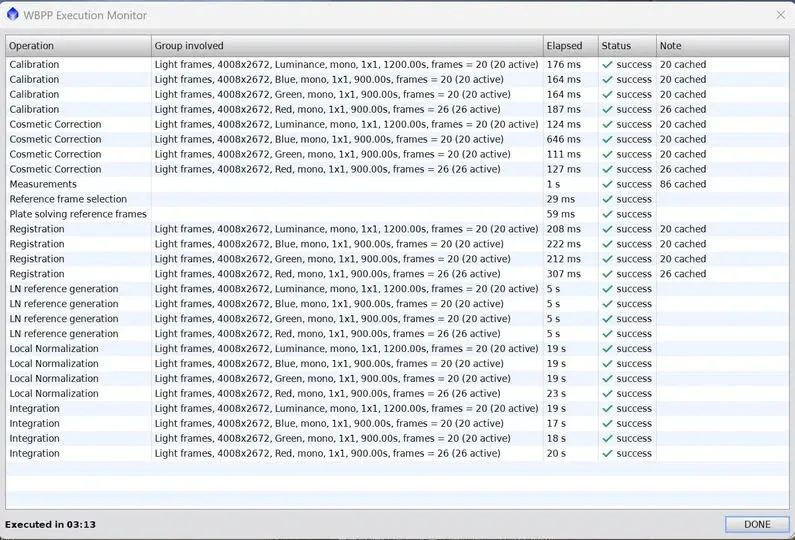
The Cache feature (version 2.5 and later). This is a crucial improvement. After a full-works run, if you find an error or something that isn’t up to expectations and change a few settings, do you really have to run the whole thing again? No. WBPP’s cache figures it out: as long as the settings you changed don’t affect the images, it simply reuses the cached results from last time; only the portion of images that’s genuinely affected gets reprocessed, so the second run’s time is dramatically shortened.
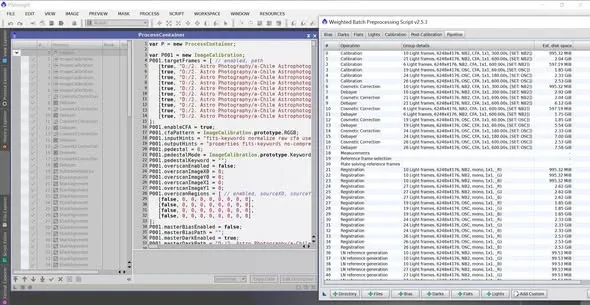
The reproducible script in the log folder. After running, the latest WBPP keeps a detailed log and execution script in the log folder. Once you read the script with PI’s Script Editor, compile it, and run it, a Process Container pops up containing all the process icons from the Pipeline submenu of the WBPP main window—each of which can be opened individually in PI. This is extremely handy for debugging: say you want to figure out why Cosmetic Correction didn’t run correctly or had no effect—you can open that step from here and check whether it’s a parameter issue or a bug in the code. Another use: for people who aren’t familiar with preprocessing, this is a way to read out every process and parameter WBPP used, as a reference template for doing it manually yourself.
The first thing to do when you open WBPP isn’t actually loading files
Finally, back to the most basic thing—and the one that’s easiest to get wrong. The first thing to do after opening WBPP is not to rush into “loading your light, dark, flat, and bias files.”
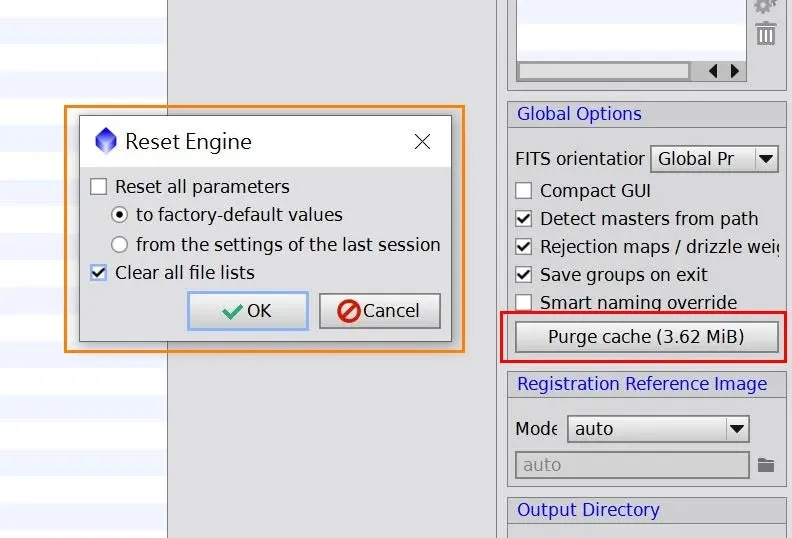
WBPP is one of the few scripts that retains what you used last time. If you’ve used it before, all your settings are still there. So the first step should be to clear the file list; whether to clear the other parameters along with it depends on your needs.
And the second step is easy to miss—many tutorial videos don’t mention it either: press Purge Cache. I mentioned earlier the benefit of the cache (version 2.5 and later): when you only change some parameters, WBPP only runs the parts that changed and reuses the cache for the rest. But conversely, when you’ve already done a run and no longer need that cached content, you need to clear it all out, otherwise running new files may trigger unpredictable errors due to duplicated cache content.
Environment prerequisites for Windows users
If you’re running WBPP on Windows, there are two environment settings you’d do well to sort out from the start—they’ll spare you a whole slew of baffling errors later on (for the related error messages and diagnostics, see “WBPP Troubleshooting”):
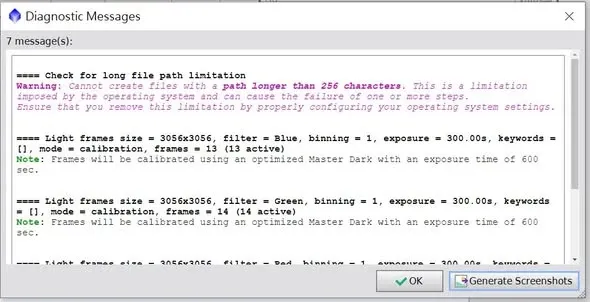
Enable long path support. After one update, WBPP on Windows kept throwing long-path warnings, saying it couldn’t generate a path longer than 256 characters. I once had WBPP’s output files come out corrupted because the path was too long (since the file couldn’t be saved). The fix is to search for regedit in the taskbar to open the Registry Editor, find the relevant location, change the value of LongPathsEnabled to 1, and restart PixInsight—after that the warning won’t appear again.
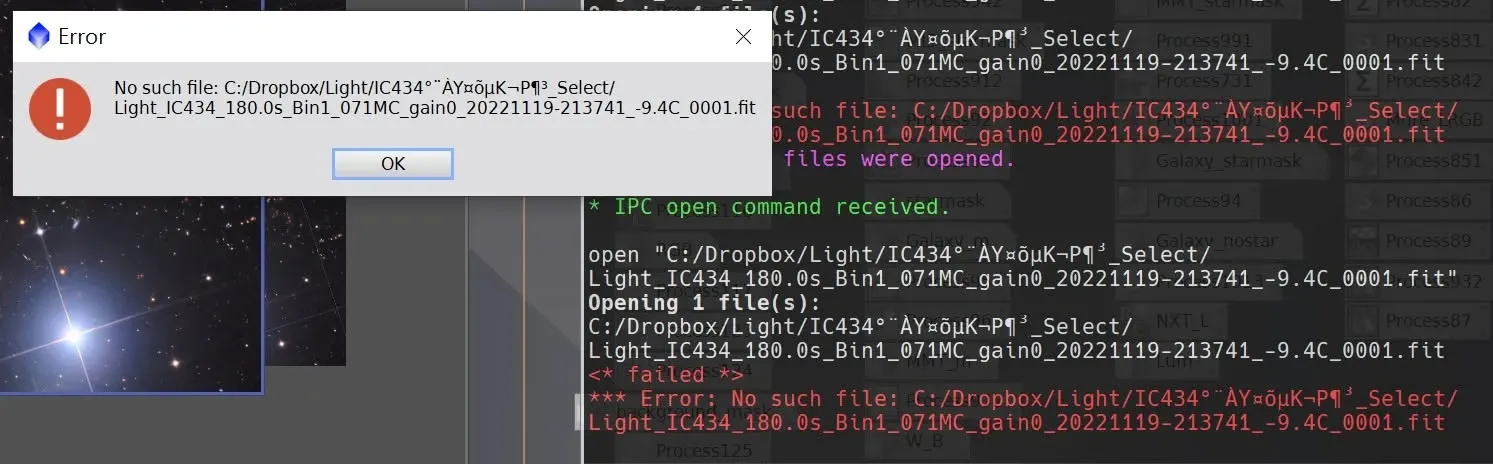
Avoid Chinese (non-Western-European) paths. This is also why I don’t recommend using Chinese for file paths. On Windows, if the default program for opening a file is PI, double-clicking a file with a Chinese path throws an error message—the garbled characters in it are actually the Chinese text. The workaround is: without changing the path, simply drag the file into PI, and it’ll open.
Put all of the above together and the full picture of WBPP is pretty much clear: it’s a powerful automated preprocessing engine, but you have to remember that its integration output is only a preview, know how to group your calibration, how to make good use of the cache, and what to clear and what environment to set up before you begin. Get the concepts right, and the rest is just a matter of practice.