Beginner Resources and Applying for a PixInsight Trial
When you first get into astronomical image post-processing, the two most common questions are: how do you get the software, and which materials should you start learning from. This article gathers a few beginner resources I recommend, and explains how to apply for the PixInsight trial.
How to try PixInsight
PixInsight is paid software with a one-time purchase model, but the official site offers a free 45-day trial. The application process is as follows:
- Go to the official trial page https://pixinsight.com/trial/ and fill out the trial application form there.
- After submitting, wait for the official “manual” review. This step isn’t automatically granted — it takes some waiting.
- Once approved, the official site sends the applicant an email with the trial account details; log in at the URL in the email to download the trial version.
- After downloading and installing, enter the activation info from the email to start your 45-day trial.
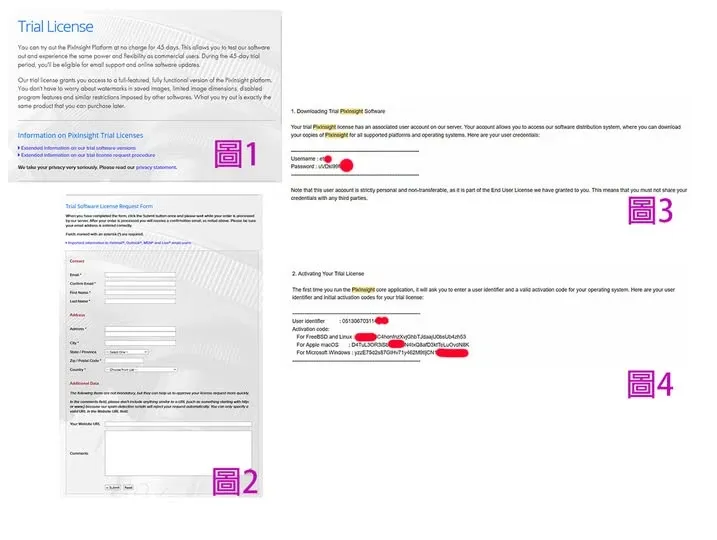
Once you have trial access, you can work through the materials and videos below and learn hands-on as you go.
The basics of calibration frames: dark, flat, and bias
Before you start stacking, you absolutely must understand the meaning and how to shoot the three calibration frames — dark, flat, and bias. This is the foundation of preprocessing; if it’s not clear, everything downstream will go crooked.
A fellow enthusiast put together a set of very clearly written articles in Chinese, in two parts, covering the meaning and shooting method of the three calibration frames thoroughly. Well worth a read for anyone who hasn’t seen them:
- A deep look at astrophotography preprocessing (part 1): the meaning and shooting of dark, flat, and bias frames https://oldmiow.blogspot.com/2021/01/blog-post_3.html
- A deep look at astrophotography preprocessing (part 2) https://oldmiow.blogspot.com/2021/01/blog-post.html
A complete demonstration of the PixInsight workflow
To quickly build an overall picture, it helps a lot to watch a full demonstration going “from preprocessing to final image.” A fellow enthusiast from Hong Kong made a set of simple PI workflow videos on his own YouTube channel, with quite complete coverage from preprocessing all the way to the finished product — very suitable for beginners:
- PI image processing workflow demo 1A https://youtu.be/xhdu9wn7H3M
- PI image processing workflow demo 1B https://youtu.be/o933ouT6VSE
An illustrated English teaching resource
There’s also a PixInsight teaching resource suitable for beginners. Although it’s written in English, it’s richly illustrated, so following along with the pictures shouldn’t be too hard:
Resource link: https://web.archive.org/web/20230608104012/https://www.astrofolio.com/pixinsight-tutorials-book.pdf
One thing to note especially: on page 25 this resource uses Photoshop’s lasso tool to make a nebula mask — but this part can actually be done in PixInsight, and more precisely than manually selecting with the PS lasso. I’ve demonstrated how to make a nebula mask in PI using an image I shot of the same target; see the video: https://youtu.be/c-gdotBXc7c
Advanced: learn directly from the software’s authors
“Simply using” PixInsight isn’t actually hard, but if you have no image processing background at all, I don’t really recommend clutching a book and grinding through it from the start. A better way is to first watch the introductory videos the Inside PixInsight authors prepared for PI newcomers. These videos are of course in English and require basic English listening skills, but the content is first-hand teaching at an official level, and worth the time investment.
That’s the beginner’s map I’d give a newcomer: first get the trial version, build a solid foundation in calibration frames, watch a full workflow demonstration once, then go deeper step by step with the materials and videos. Take it slow — it adds up, and you’ll get the hang of it.