How to Speed Up WBPP: Turning Off the Time-Consuming Options
There are plenty of videos online teaching you how to use WBPP, and many people often complain that WBPP takes too long to run — yet it seems no one has taught “how to speed up WBPP.” In fact, by leaving a few options in WBPP unchecked, you can noticeably speed up processing. This article shares these tips, following the order of WBPP’s pages.
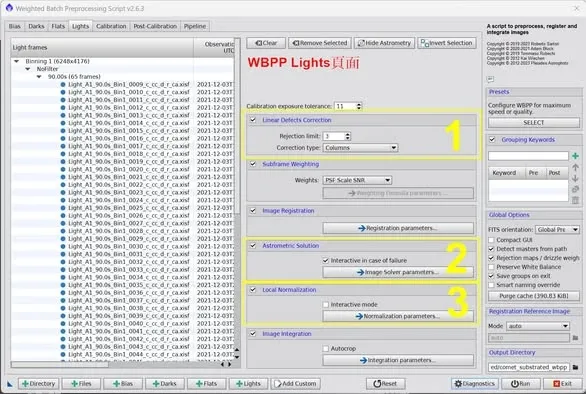
Light page
-
Linear Defects Correction: leave it unchecked. This is for CCDs, and it doesn’t work well anyway — it tends to produce artifacts.
-
Astrometric Solution: leave it unchecked. This feature is very convenient, but in some cases, if it can’t plate solve, the software will keep retrying, and only throws an error and halts the script once it has truly exhausted its options — extremely time-consuming. I recommend running ImageSolver yourself after WBPP finishes, entering the correct capture data to plate solve.
-
Local Normalization: check it at your discretion. If you just want a quick stacking result, leave it unchecked; if you want an image optimized with LN, you can go into Normalization parameters and lower the number of frames used to generate the reference image (say 7–10) to speed things up.
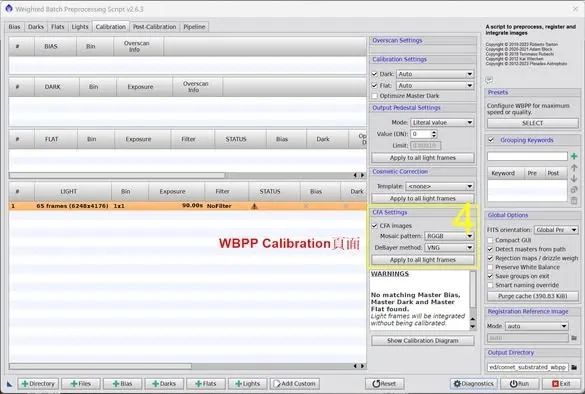
Calibration page
- CFA Settings: for a color camera, explicitly specify the CFA layout (for example the common RGGB) to avoid the software throwing an error and wasting time.
Post-Calibration page
-
Channels configuration: for a fast result, choose Combined RGB; for the best result, choose Separated RGB.
-
Drizzle configuration: if you’re not going to drizzle, or you just want a quick stacking result, leave Enable unchecked.
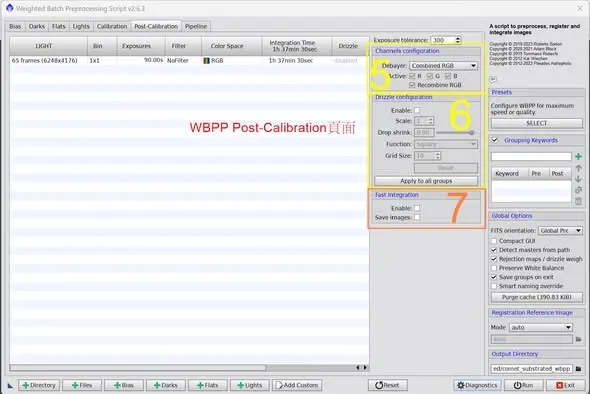
Speed options when memory is ample
- Fast Integration: if the computer running PI has ample memory, this offers a fast integration option. Once Enable is checked, WBPP won’t write intermediate files to disk during processing — it keeps everything in memory and produces only the final integrated file (if you want to keep those intermediate files, you can check Save images). In addition, Fast Integration uses a faster integration algorithm.
Those are a few tips for speeding up integration in WBPP. The core idea is to keep “going fast” and “getting the best quality” clearly separate — boldly switch off these time-consuming options when you want to see a result quickly, then switch them back on one by one when it’s time to produce the final piece.